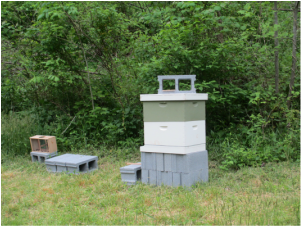
 | Last week I posted about getting our first bees. Since we are brand new to this I thought it would be fun and informative to make a basic list based off our personal experience of what we needed to get started. There are countless books, websites, videos on YouTube, and local clubs that are overflowing with information. It can be a little overwhelming when you're just starting out. So I'm going to narrow it down to a couple of books and websites that we found helpful as well. To the left you'll see our one hive. I'll go through how we chose the size, location, and what we needed to get our hive ready for bees. |
A little back story, when we moved we knew eventually we would have bees. We have wanted them for years, but never were in a great spot to have them. In the local paper I saw that there was a local bee club that met monthly just a couple miles away. They were having a big open house meeting and were giving away a hive to a new beekeeper. After spending the day unloading a moving truck with my in-laws my father-in-law and I walked in. I said I was new and they had me fill out some papers. I honestly didn't even know what I was doing. They provided a huge delicious dinner, had a knowledgeable speaker, and then drew names for the hive. I didn't win. I was disappointed. But then they started drawing names for a free package of bees. Guess who won. Guess! Yep, me. I have never won anything before, so I couldn't believe it. So all we had to do was buy a hive and the equipment. The packages of bees were scheduled to be delivered at the end of April so I had about a month to get everything together. So from passive research and reading about bees to full fledged-can't stop now-learning we managed to get everything together.
So here it is, the list I put together that has the bare minimums and basics of what we needed to start and install the first package of bees. Of course, this is only meant to be a helpful guideline from our personal experience, and what you will want or need may differ.
So here it is, the list I put together that has the bare minimums and basics of what we needed to start and install the first package of bees. Of course, this is only meant to be a helpful guideline from our personal experience, and what you will want or need may differ.
- A hive
We opted for a deep box with 10 frames. We put the hive and frames together ourselves. There are countless options online for ordering kits. Some come assembled and others you must assemble them. Personally, I think it's great to start out putting it together. It gives you a great understanding of all the parts that the hive is made of. It's really quite simple, but it is time consuming. - Paint
You need to paint your hives. Painting them protects them from the weather. You only need to paint the outside, and it doesn't matter what color you use. Many people use whatever colors are available in the discounted paints you can find at your local hardware stores. Some say to use acrylic and others say latex paints. The biggest thing to consider is that the paint is for exterior surfaces and will hold up to all seasons of weather. - Frames
Our box holds 10 frames. We used wax foundations with the frames, and we wired them to make them sturdier. You'll need to fill the bottom box of each hive you plan on having, so if you have one box then you will need just enough frames to fill that box. Different size boxes hold different numbers of frames, so you will need to know what size you have. - Wire and Eyelets
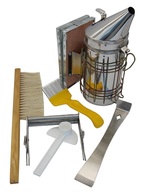
If you're using wax foundations in your frames you are probably going to want to use wire to help stabilize them. We bought 100 eyelets and a one pound spool of 26 gauge wire from Mann Lake. The frames will have holes already punched in them for the eyelets, but you will need a few more tools. - Wire Spur Embedder
This helps push the wire into the wax. - A small hammer. Here I will include a picture of what we used. Because not just any hammer will work easily. Preferably an upholstery hammer, but anything small and similar would work.
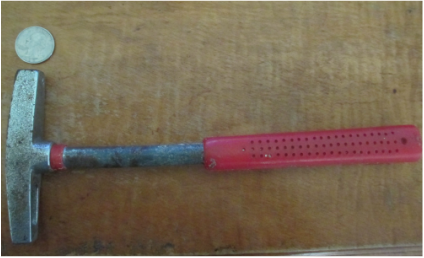 | I included a quarter in the picture so you could see approximately the size of the hammer head. The reason this hammer worked so well was because of the straight head. Too much arch or a larger tapered head would make it much more difficult to get the nails in where they needed to be.
|
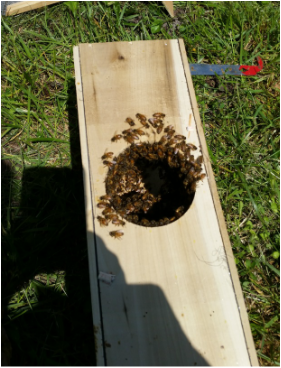
Now that you have your hive together, you will need to find a place to put your hive. You will want an area that gets good morning sun, and if possible shade midday and in the afternoon. Face the front of the hive east or south east if possible. Choose a spot that is well sheltered from strong winds, and not too damp. You don't want your hive to be in a spot where it turns into a pond after every rain. Once you find your location, you need to create a platform for your hive.
We chose a deep box to start with. A deep box is 19-13/16” x16- ¼” x 9-9/16”. Starting with a deep box gives your bees more room for brooding. Second box will be for honey storage. We're thinking of doing another deep for the second box. Then when they're ready for another box we're going to use a medium or shallow box. Medium boxes are 19-13/16” x16-¼” x 6-5/8” and shallows are 19-13/16” x 16-¼” x 5-3/4”. Going for a smaller box on top makes it a lot easier to lift to get the honey extracted.
Placement: we chose an area at the base of the mountain behind our house. It's relatively protected from strong winds and it gets the first sun every morning. By midday it's shaded so the bees will be able to stay cool during the summer months. The entrance is facing a bit southeast. Most of the rain and bad weather comes through the mountains to the north and northwest of us.
When your bees are ready to be placed into their new home, this is what you will need to have ready and available to you:
- Cinder blocks, bricks, or something to create a platform
We used 6 cinder blocks, three wide, two high. You need to keep the hive elevated from potential critter predators (like skunks). - Sugar water
You will need to feed your bees. The package comes with a can of syrup, but it is a good idea to have some already made up. - Spray Bottle
Fill with sugar water. Spray your bees when you open the package. It slows them down and keeps them from getting too angry with you. - Entrance feeder/Top Feeder
Depending on which route you want to take, you will need some sort of feeder for your bees. A top feeder goes inside the hive. An entrance feeder is external and has a long spout/trough that goes into the entrance of the hive. We have both on our hive right now. I'd recommend Googling bee feeder and choosing image search. That way you can see all the different kinds you can buy and make at home. - Entrance reducer
This is basically a stick with one side widdled out into a few inch notch and another side with a smaller one inch notch. You can turn the stick to change the size of the entrance. We lost ours somehow. Inside our shed, on a shelf. I think a gnome took it. Our great mentors used some of the handles on the package box as the reducer. So it doesn't have to be fancy. You can even use grass, and just stuff it into the entrance. - Veil/Hood/Jacket/Suit
Whether you are allergic to bees or not (and if you are you should probably not keep bees) you will need to protect at the minimum your face. We got a cheap jacket with attached hood on Amazon.com. It's thin and I don't think it would protect us much, but it does provide a barrier and gives me the illusion that I'm protected. The hood is great and my face is definitely protected. The jacket we purchased was $21.99 with free shipping. Others I have seen have ranged from $15.00 to over $100.00. It's really all about what your budget allows. - Gloves
I wish I would have bought gloves, but both my husband and I aren't fans of gloves and the way they fit. So I opted to wait until I could try some on. The gloves make reaching over to the bees much less scary, so I recommend getting some. Our mentor gave us the great advice to steer clear of the yellow deerskin gloves. He said every time he's tried them they have attacked his hands.
  |
|
Some other tips based on our first day experience, don't fill the feeders until you are ready to place them in or at your hive. The high sugar content attracts ants and other bugs, and you don't want to introduce your bees to a swarm of ants on their first day. Also, have your hive in place before you show up with bees. You want to keep the stress levels down for both yourself and the bees. When you get to the hive, you want to be able to open the package and get the bees inside immediately. And finally, understand you might get stung. Luckily none of us were stung, but I understood it was a great possibility. Our daughter has been stung before so she knew she didn't want that to happen again. We talked to her many times in the weeks leading up to getting our bees about how to act around the bees. "Be gentle, be calm, be quiet." was what we reminded her. She is four years old and did great and had no problems at all.
So there you have it, that's what we needed the first day. Below you'll find a list of links to websites and books we found helpful. We looked at many, many different books and websites so this isn't intended to be a list of the only places to go for information.
Book: Beekeeper's Guide: Fun and Simple Steps to Apiary Success and Self Sufficiency by Trevor Darby
This book was an excellent read. Darby writes in a way I found to be fun to read, he has a great sense of humor, but still is full of great information based off experiences. If you have a Kindle you can read this for free with Kindle Unlimited.
Websites:
American Beekeeping Federation
They have a great page designed to have all the information you need to get started
Brushy Mountain Bee Farm
Not only are they not too far from us, they sell all you need for bees, but I really appreciate how much they do to help be informational.
Bee Thinking
Great website packed full of information. I enjoyed the pictures included with the different articles.
Mann Lake Ltd
We ordered our wire from Mann Lake. They have great prices and videos and links to learn more about beekeeping.
I hope this post will be helpful to someone out there wondering if they should or could become a beekeeper, because YES you can! Thanks for reading! I'd love to hear about your experiences. Comment below and tell us about what helped you get started, and what your first bee installation was like.

 RSS Feed